
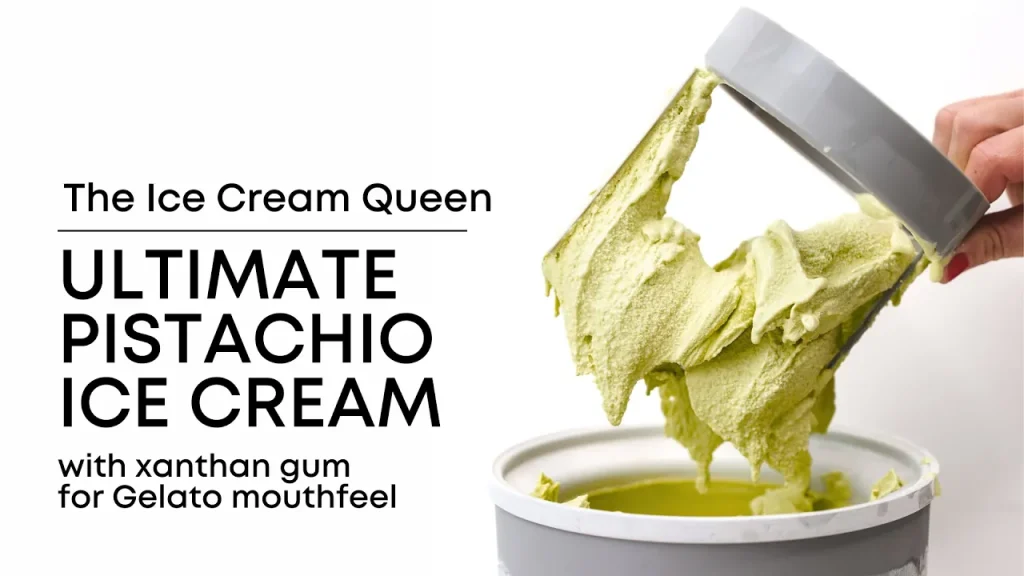
THE LIKE-A-PRO ICE CREAM
With pistachio butter, milk, heavy cream, sugar, and xanthan gum.
The best pistachio ice cream is made with pistachio butter—period. I’ve tried it all: infusing milk with pistachios, adding extracts, and using pistachio oil—nothing met my standards. Then, I found pure pistachio butter from a local producer, and the moment I unsealed the jar, it was pure pistachio heaven.
The result? An unmatched flavour no store-bought ice cream can replicate. As for texture, if you’ve made our recipes before, you already know—rich, creamy, and perfectly smooth, with zero iciness.
Ice Creams made with xanthan gum are our “Like-A-Pro” ice creams. With just one extra ingredient—xanthan gum—you can create an eggless ice cream that has a rich, full-bodied texture, churns smoothly, melts evenly when served, and stays fresh in the freezer for a long time. Just like the ice cream a professional pastry chef makes!
More to explore:
Do not reduce or replace anything; everything is there for a reason.

• Pistachio Butter: Use smooth pistachio butter 100% made from pistachios, with no added ingredients. Check the label to ensure no additional ingredients, like palm oil or sugar, are included. Since the quality of your pistachio butter directly affects the taste of the ice cream, choose wisely.
• Sugar: you can use regular sugar (white granulated sugar) or a raw cane sugar such as Demerara or Turbinado, which enhances the chocolate’s flavour.
Do not use any other sugar or sweetener, natural or artificial, liquid or powder, like honey, stevia, golden syrup, table sweeteners, confectioner’s sugar, etc.
• Milk: use whole milk, with around 3,5% fat. Do not substitute with skimmed milk (lower fat) or non-dairy milk. You need the fat, milk proteins and lactose that whole milk contains for this ice cream recipe.
• Heavy cream: For this recipe, you can use heavy cream with 35% and up to 36% fat content. It is also OK to use heavy cream suitable for whipping or ultra-pasteurised cream, if it has the right fat content (35-36% fat). Do not use low-fat or non-dairy cream, the ice cream will be icy.
• Xanthan gum can be found in speciality shops, health food stores and online. Read more about it here.
When making ice cream, prefer to weigh all the ingredients, even the liquid ones. We also recommend – whenever possible – to weigh the liquid ingredients directly into the bowl/pan as you proceed with the recipe instead of transferring them from one bowl to another because this transfer causes a small -but unwanted- loss of quantity.
If you do not have a kitchen scale, follow these guidelines:
• 1 cup (US) = 237 ml | 1 tablespoons = 15 ml
• sugar: measuring sugar in tablespoons is more accurate than measuring it in cups. Use a 15 ml measuring tablespoon (not a regular one); this is 13 gr of sugar. To measure correctly, each time you scoop the sugar, level it with the flat side of a knife.
• milk and heavy cream: thoroughly scrape with a rubber spatula any residues left on the sides and bottom of the cup every time you measure something and empty it.
Note that the quantities in each measuring system (grams, ounces, and cups) in our recipes may not always be accurate conversions; any deviations in conversions you may notice do not affect the outcome.
This recipe yields 1.2 liters (1.2 quarts) of ice cream mixture before churning, making it ideal for ice cream makers with a capacity of 1.5 to 2 liters (quarts), such as Cuisinart models.
To adjust the batch size, use the following ingredient ratios by weight based on your desired total mixture weight:
Enhance the flavor of this pistachio ice cream by replacing regular sugar with high-quality raw cane sugar, such as Demerara or Turbinado. Their subtle caramel notes perfectly complement the pistachio, adding depth to the overall taste.
For an extra layer of flavour, I also like to add a piece of lemon rind to the ice cream mixture, stirring it in and letting it infuse during the chilling process (Step 2). Just be sure to remove it before churning!
For extra crunch and texture, add unsalted, roasted pistachios to your ice cream. Lightly crush 150g (5.3 oz)—this is the perfect amount for this batch. Add them in during the last few minutes of churning, or if your machine has already stopped, remove the paddle and mix them in by hand.
A flexible rubber spatula is good for:
-wiping the bottom of the saucepan when you cook dairy on the stovetop.
-scraping residues from bowls, saucepans etc.
If you do not have one, we strongly encourage you to buy one, preferably a flexible one.
The ice cream mixture needs to cool completely and hydrate before churning, so prepare it in advance (approx. 8 hours before) to give it time to chill in the refrigerator.
If your ice cream maker has a removable freezer bowl, put it in the freezer for the whole time indicated by the manufacturer before churning, usually 24 hours.
Heat the Milk and Sugar: In a medium saucepan, combine the whole milk (590 g / 20.8 oz) and sugar (210 g / 7.4 oz).
Prepare the Pistachio Butter: Place the pistachio butter (150 g / 5.3 oz) in a large bowl and set a whisk into the bowl.
Set up the Blender and have it ready to use, along with the xanthan gum; you’ll need to work quickly once the milk is hot.
Warm the Milk: Heat the milk over medium-high heat, stirring often with a rubber spatula, until the sugar dissolves and the milk is hot and steamy (about 70°C / 158°F). Avoid boiling, but do make sure it is very steamy.
Incorporate the Hot Milk: Pour the hot milk over the pistachio butter, a little at a time, whisking to smooth. Scrape the sides and bottom of the bowl with the rubber spatula to fully incorporate any pistachio butter residue.
Add the Xanthan Gum: Pour the hot mixture into a blender, and with the blender on, sprinkle the xanthan gum (½ teaspoon) over the blending mixture; blend for 2 minutes – set a timer.
Incorporate the Cold Heavy Cream: Add the cold heavy cream (260 g / 9.2 oz) and blend again, pausing once to scrape with the rubber spatula on the sides and bottom of the blender for an even consistency.
Strain into the bowl: Pour the mixture through a fine-mesh sieve and back into the bowl, scraping down any residues (you can use the same bowl as before; no need to rinse it). Give a last, thorough stirring to the ice cream mixture, scraping the bottom and sides of the bowl.
Cool the mixture with an ice bath: Place the bowl with the ice cream mixture inside a larger one and fill the space around it with ice cubes and cold water to create an ice bath. Make sure no water gets into the mixture. About 200 g (7 oz) of ice—roughly one standard tray—is enough to cool it down properly.
Let the mixture cool in the ice bath for about 30 minutes, stirring occasionally to help it cool evenly.
Chill completely: Once the mixture is no longer warm, remove the bowl from the ice bath, cover it and refrigerate for at least 8 hours or up to 3 days. The base should be fridge-cold before churning.
Check if the ice cream mixture is cold before churning it: 4ºC–12ºC / 39ºF-54ºF / it feels fridge-cold when you place your index finger into it.
Prepare the Ice Cream Maker according to the manufacturer’s instructions.
Blend before churning: briefly blitz the ice cream mixture with an immersion blender, stopping once to scrape down the sides and bottom with a rubber spatula. This improves consistency and ensures a smooth, even texture.
Churn: with the machine running, pour the ice cream mixture through the canister and into the ice cream maker. Leave to churn until fluffed up and creamy; depending on your ice cream maker, this can take anywhere from 30-60 minutes.
This ice cream mixture expands and becomes airy as it churns. You’ll know it’s ready when it looks smooth, creamy, and slightly wavy—similar to soft-serve ice cream. Churning time varies depending on your machine and can take anywhere from 30 to 70 minutes.
To check the texture, lift a spoonful. It should be thick enough to stay on the spoon, but still soft. If it looks too thin or starts melting immediately, it needs more time.
If you’re unsure, let it churn for 10 more minutes. Keep in mind that it won’t look like store-bought ice cream at this point—it will still be soft. It only becomes firm and scoopable after a few hours in the freezer.
Stop the machine once the mixture is thick and creamy. If you continue churning beyond that point, the mixture can start losing the air it has built up and may seize, resulting in a dense, heavy texture.
One important note: some ice cream makers are programmed to stop automatically after a fixed time, but that doesn’t always mean the ice cream is ready. If your machine stops and the mixture still looks too soft, simply restart it and continue churning until the texture improves.
Put in the freezer to set: before serving the ice cream or moving it to a container for storing, you have to put it in the freezer to set. To do so, turn off the ice cream maker and:
· remove the removable freezer bowl (still filled with the ice cream) from the ice cream machine
· remove the paddle, scraping any ice cream attached to it back into the ice cream bowl
· cover the ice cream bowl and place it in the freezer
Setting time depends on many factors; see notes below for indicative times.
Serve or store: when it sets, you can serve it directly from the removable freezer bowl or transfer it to an airtight container for longer storage.
The setting time depends on the type of ice cream maker you’re using. Here are the general guidelines:
3–5 hours for machines with removable freezer bowls (these bowls must be pre-frozen before churning)
Under 1 hour for machines with built-in compressors and aluminum bowls
⚠️ Important: Ice cream in aluminum bowls sets quickly. Do not leave it for too long—once fully frozen, it can become extremely hard and difficult to remove without risking scratches to the bowl. Always monitor it closely.
To check if the ice cream is ready, aim for an internal temperature of –11°C (12°F). If you don’t have a thermometer, use this simple test:
Insert a round-tip knife all the way to the bottom of the ice cream:
✔ If it goes in smoothly but meets gentle resistance, it’s ready
✖ If it feels hard on top but soft underneath, it needs more time
✖ If it’s too firm to insert the knife, it’s over-frozen and likely too hard to scoop
If it’s over-frozen, don’t worry—head to the next section for how to bring it back to scoopable.
If the ice cream sits in the freezer in the removable freezer bowl for too long after it has set, it can become too hard to scoop or remove.
To make it scoopable again:
Place the bowl in the refrigerator and allow the ice cream to soften gradually.
Here’s how long that may take:
4–10 hours for removable freezer bowls (pre-freeze models)
1–2 hours for aluminum bowls (from compressor ice cream makers)
Note: These times are approximate and may vary depending on your fridge and the amount of ice cream. Check the texture occasionally as it softens.
Once the ice cream is soft enough to scoop—or its internal temperature reads approximately –11°C (12°F)—you can:
✔ Transfer it to another container and store it in the freezer
✔ Or serve it directly from the bowl
Just be sure to avoid digging into an over-frozen bowl with hard utensils, especially if using a nonstick-coated or aluminum bowl.
Straight after churning, the ice cream has a soft-serve consistency and melts almost instantly on contact. At this stage, it’s too soft to serve neatly or transfer easily—it’s simply too messy to handle.
Freezing the ice cream immediately after churning allows it to set properly. This step brings it to the right texture: scoopable, stable, and easy to portion or transfer into a storage container.
It’s the final step that turns churned ice cream into finished ice cream.
Storing: Transfer the finished ice cream to a lidded container and store it in the freezer for up to one month.
Cover it well to protect it from absorbing any unwanted freezer smells.
Scooping: Like all artisanal-style ice creams, this one freezes hard over time.
To make it scoopable again, place the container in the refrigerator for 45–60 minutes, or until the internal temperature reaches about –11°C (12°F).
Once softened, it’ll scoop cleanly and serve beautifully.
Your privacy settings
Manage Consent Preferences
Necessary
Analytics
Embedded Videos
Marketing
Facebook Advanced Matching
Facebook CAPI


11 Responses
Looks good, been waiting for some nut recipes to try. I’ve been making gelato out of the Messina book so this will be interesting to compare
Messina hazelnut gelato
MILK / 670 G (11.2 LB) SUGAR / 145 G (5 OZ) SKIM MILK POWDER / 30 G (1 OZ) DEXTROSE / 50 G (13.4 OZ) STABILISER / 5 G (1.5 OZ) HAZELNUT PASTE / 100 G (31.2 OZ) • MAKES 1 KG (2 LB 3 OZ
I haven’t come across this cookbook before—thanks for sharing!
And is the xanthan blended for 2 minutes?
Yes, just fixed it; thank you! 🙂
Hallo, ich habe es genau nach Anweisung gemacht und musste beim Ausstellen des Mixers feststellen das sich gelartige Klümpchen am Mixer gebildet haben. Ich bezweifle das das Xanthan sich mit der Flüssigkeit verbunden hat.
Mir fehlt zudem die Angabe ob die Schlagsahne flüssig oder im geschlagenen Zustand untergerührt wird.
V.G.
Gudrun
Die Anleitung ist für einen Standmixer gedacht, nicht für einen Handmixer. Ein Handmixer kann das Xanthan nicht richtig einarbeiten. Die Sahne muss flüssig sein.
Ich habe einen Standmixer genommen, bzw. eine große Küchenmaschine.
Oder meinten Sie einen Pürrierstab?
Was soll ich jetzt tun? Wird das Eis überhaupt etwas?
Danke für die Rückmeldung!
Mit „Blender“ meine ich einen leistungsstarken Standmixer – also so etwas wie einen Smoothie-Maker, der Flüssigkeiten wirklich fein pürieren kann. Eine Küchenmaschine oder ein Handmixer kann das Xanthan leider nicht richtig einarbeiten – das wirkt sich auf die Textur aus.
Ein Pürierstab kann funktionieren, wenn er stark genug ist und du die Masse gut und gleichmäßig durchmischst – aber ideal ist es nicht.
Wenn du das Xanthan schon drin hast und es nicht richtig gemixt wurde: kein Stress! Gib die Mischung am besten noch einmal in einen Standmixer und mixe sie gründlich durch. Danach unbedingt durch ein feines Sieb geben, um sicherzugehen, dass keine Klümpchen zurückbleiben.
Das Eis kann trotzdem super werden.
Im Video zeige ich genau, wie ich es mache – vielleicht hilft dir das weiter!
Viel Erfolg und sag gern Bescheid, wie’s geworden ist!
Es ist jetzt fertig und gut durchgefroren.
Der Geschmack ist super, so wie meiner Meinung nach Pistazieneis schmecken muss.
Es ist cremig obwohl durch meinen Fehler kaum Xanthan drin ist.
Kann es sein das alleine durch die Pistaziencreme es schon gut cremig wird?
Deine Beobachtung ist wirklich großartig! Ja, Pistaziencreme bringt tatsächlich von sich aus eine schöne Cremigkeit mit – durch das enthaltene Fett und die dichte Konsistenz.
Ohne Xanthan kann die Textur mit der Zeit im Gefrierfach etwas leiden, weil mehr freies Wasser vorhanden ist – das kann zu Eiskristallen führen, wenn das Eis länger steht.
Aber solange es jetzt cremig und stimmig ist, passt alles wunderbar!
Hello, I have just prepared the ice cream. After mixing it with xanthan gum, I found small lumps stuck to the mixer. Is that bad? I worked exactly according to the instructions.
I am also missing the information as to whether the whipped cream should be stirred in liquid or solid.
I look forward to an answer.