THE NO CHURN COLLECTION
With milk, heavy cream, sugar, xanthan gum, and gelatine.
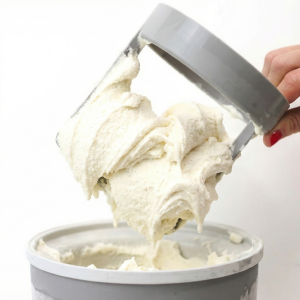
How to make ice cream without an ice cream maker or any machine using one extraordinary ingredient: xanthan gum. No egg yolks, no condensed milk, no cheating! Real ice cream made with real ingredients: milk, heavy cream, sugar, plus xanthan gum, and gelatin to get things right.
Even though the texture and mouthfeel of real ice cream made with an ice cream machine are unbeatable, this recipe still gives you an authentic flavour, much better than the usual no-churn condensed milk ice cream recipes.
What makes it special:
It is also my go-to recipe for making ice cream for my ice cream pops or moulds. I hope you will love it as much as I do!
More to explore:
Do not reduce or replace anything; everything is there for a reason.

• Gelatine sheets or granules: The recipe includes instructions for both types. I use Platinum gelatine sheets with a bloom strength of 235-265, which is the standard gelatine sheet found in my grocery store’s baking aisle.
• Sugar: use regular sugar (white granulated sugar). Another option is raw cane sugar, such as Demerara or Turbinado, which gives a subtle caramel flavour. Do not use any other sugar or sweetener, natural or artificial, liquid or powder, like honey, stevia, golden syrup, table sweeteners, confectioner’s sugar, etc.
• Milk: use whole milk, with around 3,5% fat. Do not substitute with skimmed milk (lower fat) or non-dairy milk. You need the fat, milk proteins and lactose that whole milk contains for this ice cream recipe.
• Heavy cream: For this recipe, you can use heavy cream with 35% and up to 36% fat content. It is also OK to use heavy cream suitable for whipping or ultra-pasteurised cream, if it has the right fat content (35-36% fat). Do not use low-fat or non-dairy cream, the ice cream will be icy.

When making ice cream, prefer to weigh all the ingredients, even the liquid ones. We also recommend – whenever possible – to weigh the liquid ingredients directly into the bowl/pan as you proceed with the recipe instead of transferring them from one bowl to another because this transfer causes a small -but unwanted- loss of quantity.
If you do not have a kitchen scale, follow these guidelines:
• 1 cup (US) = 237 ml | 1 tablespoons = 15 ml
• sugar: measuring sugar in tablespoons is more accurate than measuring it in cups. Use a 15 ml measuring tablespoon (not a regular one); this is 13 gr of sugar. To measure correctly, each time you scoop the sugar, level it with the flat side of a knife.
• milk and heavy cream: thoroughly scrape with a rubber spatula any residues left on the sides and bottom of the cup every time you measure something and empty it.
Note that the quantities in each measuring system (grams, ounces, and cups) in our recipes may not always be accurate conversions; any deviations in conversions you may notice do not affect the outcome.
This recipe makes a 1.2 litre/quart ice cream mixture (before churning).
If you need to scale the ice cream mixture up or down, use this ratio of the ingredients (in weight only):
whole milk 37.7% | heavy cream 47.1% | sugar 15.1 % | xanthan gum 0.2% | in desired total weight of ice cream mixture | and approx. 1 gelatine sheet / 1 teaspoon per 800 g / 28.2 oz
When scaling the recipe up or down, use these proportions to determine the amounts of milk or heavy cream to boil and whip:
The above ratios are important because by combining that much boiling-hot milk with that much cold milk, the blend comes to the right temperatures to activate the gelatin and xanthan gum.
A flexible rubber spatula is good for:
-wiping the bottom of the saucepan when you cook dairy on the stovetop.
-scraping residues from bowls, saucepans etc.
If you do not have one, we strongly encourage you to buy one, preferably a flexible one.
The mixture needs to cool completely and hydrate before putting in the freezer to set, so prepare it in advance (approx. 8 hours before) to give it time to chill in the refrigerator.
Pour half of the cold milk (150 g; 5.3 oz) into the blender jug and have the blender set up and ready to blend.
Add the gelatine to the blender with the cold milk:
Set aside for 10 minutes for the gelatine to soften, stirring 2–3 times, to fully moisten the gelatine.
Bring to a boil the rest of the milk, all the sugar, and 1/5 of the heavy cream. In a medium saucepan, pour the rest of the milk (150 g; 5.3 oz), all the sugar (120 g; 4.2 oz), and 1/5 of the heavy cream (75 g; 2.6 oz).
Warm over medium heat, often stirring, until the sugar dissolves and the milk is hot and steamy. Do not let the milk boil before the sugar dissolves.
Increase the heat to high. As soon as the milk comes to a rolling boil (when large bubbles that pop vigorously appear on the surface / approx. 90°C / 195°F / if it starts to overflow), immediately remove it from the heat and
immediately pour the boiling-hot milk into the blender jug with the cold milk.
Turn the blender on (low speed). Note: By blending that much boiling hot cream with that much fridge-cold milk, the blend instantly reaches approximately 55 °C/132°F. This temperature is ideal for efficiently dissolving xanthan gum and the gelatine to activate.
Sprinkle in the xanthan gum: with the blender on, carefully open the cap and slowly sprinkle the xanthan gum (½ teaspoon) over the surface, aiming for the centre.
Blend for 2 minutes to fully hydrate the xanthan gum; do not estimate the time; set a timer. Do not expect the blend to thicken; it will thicken as it cools.
Put in the fridge overnight: Pour the mixture into a large bowl, leave to cool for 30 minutes, and then place in the fridge overnight to chill.
After resting in the fridge, the milk gel is slightly thick, almost set to a gel, but falls from the spoon with a plop. In this step, we will whip the remaining 4/5 of the heavy cream into soft peaks and then fold it into the milk gel.
Whip the remaining cold heavy cream into soft peaks: Pour the remaining 4/5 cold heavy cream (300 g; 10.6 oz) into a bowl and whip to soft peaks. Soft peaks are when the heavy cream has tripled in volume and beautiful waves form on the surface while whipping. Do not over-whip, or it will become heavy and lose volume.
Whisk the milk jelly briefly with a balloon whisk to smooth it.
Gradually fold the whipped heavy cream into the milk jelly:
Scrape the inside of the bowl with a rubber spatula: To bring everything together perfectly smoothly, use a rubber spatula to wipe all residues off the inside of the bowl.
Give one final whip with the mixer for a few seconds, careful not to deflate the mixture.
Pour the mixture into a freezable mould: I use a cake mould, but you can use anything you like. You can also use this mixture to make ice pops, ice cream terrines etc.
Put in the freezer to set: the setting time is approximately 2-4 hours and depends on the freezer and the depth of the filled ice cream mould.
To check if the ice cream has set, insert a round tip knife into it all the way to the bottom of the mould:
– When the ice cream is ready, it should feel firm as you go down and soft enough to insert the knife.
– If it’s not ready, it may feel hard on the top and softer as you go down.
– If it’s been in the freezer for too long, the ice cream is too hard to insert the knife and likely to scoop out of the ice cream bowl. In this case, just put it in the fridge to thaw for 40-60 minutes.
Storing: In the freezer for one month, cover it well to protect it from absorbing the freezer’s smells.
Scooping: Like all artisanal ice cream, this ice cream freezes hard in the long term. To make it perfectly scoop-able again, put it in the refrigerator for 45-60 minutes until soft or until its internal temperature reads -11°C / 12°F.

Your privacy settings
Manage Consent Preferences
Necessary
Analytics
Embedded Videos
Marketing
Facebook Advanced Matching
Facebook CAPI