
THE LIKE-A-PRO ICE CREAM
With unsweetened cocoa powder, milk, cream, sugar, and xanthan gum.
This Cocoa-only ice cream is perfect for celebrating the flavour of your favourite cocoa powder. It’s also great for those days when you want to make chocolate ice cream but only have cocoa powder in the cupboard. We love it for its mild chocolate flavour, which is also perfect for children.
Ice Creams made with xanthan gum are our Like-A-Pro ice creams, because with just one extra ingredient -xanthan gum-, you can make an eggless ice cream with a perfect, full-bodied mouthfeel, which churns beautifully, melts uniformly during serving, and keeps well in the freezer for a long time. Just like professionals do!
No xanthan gum? Here are 3 more ways to make this ice cream:
PLAIN & PERFECT. This easy Philadelphia-style version uses the fewest ingredients, and relies on some extra heavy cream as the key to its rich, creamy texture. With cocoa powder, milk, heavy cream, sugar.
THE FRENCH-STYLE ICE CREAM. Rich and velvety, this is a custard-based ice cream; a tad bit tricky to make, but so worth it. With cocoa powder, milk, heavy cream, sugar, egg yolks.
THE ITALIAN WAY. This is your hot weather ice cream: easy to make, and resistant to melting. Also the lowest in heavy cream. With cocoa powder, milk, heavy cream, sugar, cornstarch.
Do not reduce or replace anything; everything is there for a reason.

• Sugar: use regular sugar (white granulated sugar). Another option is raw cane sugar such as Demerara or Turbinado, which enhances the ice cream’s flavours. Do not use any other sugar or sweetener, natural or artificial, liquid or powder, like honey, stevia, golden syrup, table sweeteners, confectioner’s sugar, etc.
• Heavy cream: For this recipe, you can use heavy cream with 35% and up to 36% fat content. It is also OK to use heavy cream suitable for whipping or ultra-pasteurised cream, if it has the right fat content (35-36% fat). Do not use low-fat or non-dairy cream, the ice cream will be icy. For heavy cream with other fat content, refer to this calculator.
This is a quick overview of the recipe. If you are new to ice cream making, do read the recipe before proceeding.
Bring to a boil cocoa, sugar, part of milk and heavy cream.

Pour in the blender jug with rest of the cold milk. Turn the blender on and sprinkle the xanthan gum.

Add the remaining heavy cream.

Put the ice cream mixture in the refrigerator overnight, or until completely cold.

Churn in your ice cream maker until creamy and wavy.

Put it in the freezer for a few hours to set.

As soon as it sets, you can either serve it from the ice cream maker bowl or transfer it to a container and store it in the freezer.


When making ice cream, prefer to weigh all the ingredients, even the liquid ones. We also recommend – whenever possible – to weigh the liquid ingredients directly into the bowl/pan as you proceed with the recipe instead of transferring them from one bowl to another because this transfer causes a small -but unwanted- loss of quantity.
If you do not have a kitchen scale, follow these guidelines:
• 1 cup (US) = 237 ml | 1 tablespoon = 15 ml
• sugar: measuring sugar in tablespoons is more accurate than measuring it in cups. Use a 15 ml measuring tablespoon (not a regular one); this is 13 gr of sugar. To measure correctly, each time you scoop the sugar, level it with the flat side of a knife.
• cocoa powder: first, sift the cocoa powder into a bowl and then measure by the spoonful by gently taking a spoonful at a time; and levelling it with the flat side of a knife. Do measure the cocoa powder right after sifting it, as its volume lessens while it sits.
• milk and heavy cream: thoroughly scrape with a rubber spatula any residues left on the sides and bottom of the cup every time you measure something and empty it.
Note that the quantities in each measuring system (grams, ounces, and cups) in our recipes may not always be accurate conversions; any deviations in conversions you may notice do not affect the outcome.
This recipe makes a 1.2 litre/quart ice cream mixture (before churning), perfect for ice cream makers with a capacity of 1.5 and up to 2 litres/quarts (like Cuisinart ice cream makers).
If you need to scale the ice cream mixture up or down, use this ratio of the ingredients (in weight only):
milk 45% / heavy cream 36.4% / sugar 16.38 % / cocoa powder 2.1% / xanthan gum 0.12%
in desired total weight of ice cream mixture.
For example, if you want to make 1000 g (approx. 1 litre) of ice cream mixture, you need:
• 1000 g x 45% = 450 g milk
• 1000 g x 36.4% = 364 g heavy cream
• 1000 g x 16.38% = 164 g sugar
• 1000 g x 2.1% = 21 g cocoa powder
• 1000 g x 0.12% = 1.2 g xanthan gum
You can adjust the quantity of the xanthan gum in the recipe to your liking, depending on the texture you want to achieve:
A flexible rubber spatula is good for:
-wiping the bottom of the saucepan when you cook dairy on the stovetop.
-scraping residues from bowls, saucepans etc.
If you do not have one, we strongly encourage you to buy one, preferably a flexible one.
The ice cream mixture needs to cool completely and hydrate before churning, so prepare it in advance (approx. 8 hours before) to give it time to chill in the refrigerator.
If your ice cream maker has a removable freezer bowl, put it in the freezer for the whole time indicated by the manufacturer before churning, usually 24 hours.
Pour 2/3 of the cold milk (350 g; 12.3 oz) into the blender jug and have the blender set up and ready to use.
Combine the sugar and cocoa powder in a medium saucepan: Add the sifted cocoa powder (25 g; 1 oz) and the sugar (190 g; 6.7 oz) into a medium saucepan and stir thoroughly to combine until the mixture is a uniform colour with no streaks.
Add 1/3 of the milk and 1/4 of the cream: Pour the remaining 1/3 of the milk (175 g; 6.2 oz) and approx. 1/4 of the heavy cream (100 g; 3.5 oz) into the saucepan and stir with the rubber spatula to moisten the sugar and cocoa powder. Scrape the saucepan’s bottom, corners, and sides to ensure they are lumps-free.
Bring to a boil: Warm over medium heat, often stirring, until the cocoa dissolves and the milk is hot and steamy.
Increase the heat to high. As soon as the milk comes to a rolling boil (when large bubbles that pop vigorously appear on the surface / approx. 95°C / 203°F / if it starts to overflow), immediately remove it from the heat and
Pour the hot cocoa mixture into the blender jug and turn the blender on (medium speed).
Sprinkle in the xanthan gum: with the blender on, carefully open the cap and slowly sprinkle the xanthan gum (½ teaspoon) over the blending surface of the mixture, avoiding the sides of the cap.
Blend for 2 minutes to fully hydrate the xanthan gum; do not estimate the time; set a timer. Do not expect the blend to thicken; it will thicken as it cools.
Combine the warm cocoa mixture with the remaining cold heavy cream (325 g; 11.5 oz) if your blender is large enough, you can add the remaining heavy cream into the blender, blend until it is a uniform brown colour, then pour into a bowl. Else, pour the cold heavy cream into a large bowl, add the warm cocoa mixture, scraping residues off the blender and stir with a rubber spatula to combine
Strain the ice cream mixture over a fine-mesh sieve and into a bowl.
Cool it down: prepare an ice bath by putting the bowl with the ice cream mixture into a larger bowl and filling the empty sides with ice cubes and cold water. How many ice cubes? A tray of ice cubes (200 g; 7 oz of ice) is enough to cool down the ice cream mixture: we just need to cool it down until it is no longer warm to the touch so that you can safely put it in the refrigerator. This will take approx. 15 minutes; do stir occasionally.
Chill until completely cold: cover the bowl and refrigerate for at least 8 hours and up to 3 days. Xanthan gum needs 6-8 hours in the refrigerator to fully develop, so do not rush the cooling process.
Check if the ice cream mixture is cold before churning it: 4ºC–12ºC / 39ºF-54ºF / it feels fridge-cold when you place your finger into it.
Prepare the ice cream maker according to the manufacturer’s instructions.
Blend before churning: briefly blitz the ice cream mixture with an immersion blender, stopping once to scrape down the sides and bottom with a rubber spatula. This improves consistency and ensures a smooth, even texture.
Churn: with the machine running, pour the ice cream mixture through the canister and into the ice cream maker. Leave to churn until fluffed up and creamy; depending on your ice cream maker, this can take anywhere from 30-60 minutes.
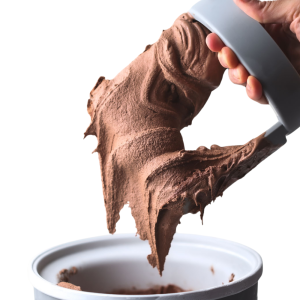
This ice cream mixture expands and becomes airy as it churns. You’ll know it’s ready when it looks smooth, creamy, and slightly wavy—similar to soft-serve ice cream. Churning time varies depending on your machine and can take anywhere from 30 to 70 minutes.
To check the texture, lift a spoonful. It should be thick enough to stay on the spoon, but still soft. If it looks too thin or starts melting immediately, it needs more time.
If you’re unsure, let it churn for 10 more minutes. Keep in mind that it won’t look like store-bought ice cream at this point—it will still be soft. It only becomes firm and scoopable after a few hours in the freezer.
Stop the machine once the mixture is thick and creamy. If you continue churning beyond that point, the mixture can start losing the air it has built up and may seize, resulting in a dense, heavy texture.
One important note: some ice cream makers are programmed to stop automatically after a fixed time, but that doesn’t always mean the ice cream is ready. If your machine stops and the mixture still looks too soft, simply restart it and continue churning until the texture improves.
Put in the freezer to set: before serving the ice cream or moving it to a container for storing, you have to put it in the freezer to set. To do so, turn off the ice cream maker and:
· remove the removable freezer bowl (still filled with the ice cream) from the ice cream machine
· remove the paddle, scraping any ice cream attached to it back into the ice cream bowl
· place it in the freezer, uncovered
Setting time depends on many factors; see notes below for indicative times.
Serve or store: when it sets, you can serve it directly from the removable freezer bowl or transfer it to an airtight container for longer storage.
The setting time depends on the type of ice cream maker you’re using. Here are the general guidelines:
3–5 hours for machines with removable freezer bowls (these bowls must be pre-frozen before churning)
Under 1 hour for machines with built-in compressors and aluminum bowls
⚠️ Important: Ice cream in aluminum bowls sets quickly. Do not leave it for too long—once fully frozen, it can become extremely hard and difficult to remove without risking scratches to the bowl. Always monitor it closely.
To check if the ice cream is ready, aim for an internal temperature of –11°C (12°F). If you don’t have a thermometer, use this simple test:
Insert a round-tip knife all the way to the bottom of the ice cream:
✔ If it goes in smoothly but meets gentle resistance, it’s ready
✖ If it feels hard on top but soft underneath, it needs more time
✖ If it’s too firm to insert the knife, it’s over-frozen and likely too hard to scoop
If it’s over-frozen, don’t worry—head to the next section for how to bring it back to scoopable.
If the ice cream sits in the freezer in the removable freezer bowl for too long after it has set, it can become too hard to scoop or remove.
To make it scoopable again:
Place the bowl in the refrigerator and allow the ice cream to soften gradually.
Here’s how long that may take:
4–10 hours for removable freezer bowls (pre-freeze models)
1–2 hours for aluminum bowls (from compressor ice cream makers)
Note: These times are approximate and may vary depending on your fridge and the amount of ice cream. Check the texture occasionally as it softens.
Once the ice cream is soft enough to scoop—or its internal temperature reads approximately –11°C (12°F)—you can:
✔ Transfer it to another container and store it in the freezer
✔ Or serve it directly from the bowl
Just be sure to avoid digging into an over-frozen bowl with hard utensils, especially if using a nonstick-coated or aluminum bowl.
Straight after churning, the ice cream has a soft-serve consistency and melts almost instantly on contact. At this stage, it’s too soft to serve neatly or transfer easily—it’s simply too messy to handle.
Freezing the ice cream immediately after churning allows it to set properly. This step brings it to the right texture: scoopable, stable, and easy to portion or transfer into a storage container.
It’s the final step that turns churned ice cream into finished ice cream.
Storing: Transfer the finished ice cream to a lidded container and store it in the freezer for up to one month.
Cover it well to protect it from absorbing any unwanted freezer smells.
Scooping: Like all artisanal-style ice creams, this one freezes hard over time.
To make it scoopable again, place the container in the refrigerator for 45–60 minutes, or until the internal temperature reaches about –11°C (12°F).
Once softened, it’ll scoop cleanly and serve beautifully.


2 Responses
I’m diabetic,why would allulose not work ?
Sugar does much more in the ice cream than sweetening it: it traps the free water in the ice cream mixture and adds to the creamy ice cream mouthfeel. Sweeteners do not have this ability to trap water. And this free water in the ice cream makes it icy.
Furthermore, each sweetener has its own sweetening ability, which means one cannot substitute e.g. 100 g of sugar with 100 gr of stevia unless they know how sweet this 100 g of stevia is.
If you know how much allulose you need to substitute with the amount of sugar for this recipe, then you can try it. But do expect the ice cream to have a cold mouthfeel; and to turn icy, after a day or two in the freezer.