SWIRLED AND LAYERED ICE CREAMS
Inspired by two classics.
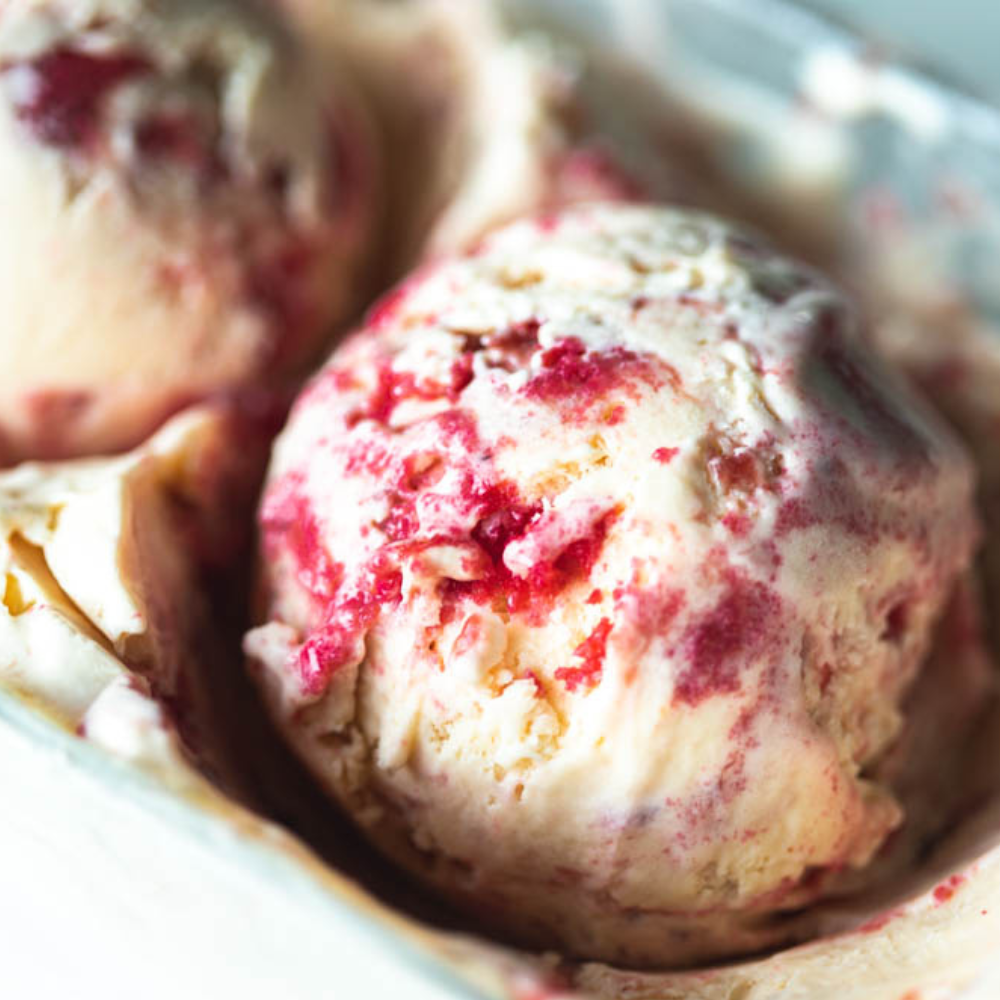
“Strawberry Daiquiri Tiramisu Ice Cream” is the most descriptive name I could come up with for this utterly delightful, rum-y ice cream with strawberry daiquiri swirls. It consists of mascarpone ice cream enhanced with white rum, in which strawberry daiquiri swirls are added. Τo further increase the strawberry daiquiri effect, the ladyfingers are soaked in a strawberry syrup mixed with more white rum.
This ice cream is a very addictive one, the kind you want to pull out of the freezer and enjoy on the balcony on a warm summer night.
When making ice cream prefer to weigh all the ingredients by weight. We also recommend, whenever possible, weighing the liquid ingredients directly into the bowl/pan as you proceed with the recipe instead of transferring them from one bowl to another because this transfer causes a small -but unwanted- loss of quantity.
Note that the quantities in each measuring system (grams, ounces, and cups) are not accurate conversions; we sometimes round them up in a way that makes sense. Small deviations do not affect the outcome.
If you do not have a kitchen scale, follow these guidelines:
• 1 cup (US) = 237 ml | 1 tablespoon = 15 ml
• sugar: measuring sugar in tablespoons is more accurate than measuring it in cups. Use a 15 ml measuring tablespoon (not a regular one); this is 13 gr of sugar. To measure correctly, each time you scoop the sugar, level it with the flat side of a knife.
• liquid ingredients: thoroughly scrape with a rubber spatula any residues left on the sides and bottom of the cup every time you measure something and empty it.
A flexible rubber spatula is good for:
-wiping the bottom of the saucepan when you cook dairy on the stovetop.
-scraping residues from bowls, saucepans etc.
If you do not have one, we strongly encourage you to buy one, preferably a flexible one.
Before starting, make sure that your ice cream maker is ready for churning when needed. This means that if it has a removable freezer bowl, it should be put in the freezer for the whole time indicated by the manufacturer, usually 24 hours.
In a large heatproof bowl, put the cold egg yolks and whisk well. Put the bowl in the fridge to keep them cold, leaving the whisk in the bowl to have it ready.
In a medium saucepan, put the milk and the sugar.
Warm the milk and sugar over low-medium heat, stirring often until the milk is hot and steamy and all the sugar has melted.
Increase the heat to medium-high; when the first bubbles (soft boil) appear on the surface of the milk, remove the egg yolks from the fridge and set them next to the stovetop.
As soon as the milk bubbles vigorously (full boil), remove from the heat and immediately start pouring it in a steady stream into the egg yolks with one hand, while whisking them vigorously with the other.
Important: While the custard is still hot, use a spatula to thoroughly scrape the sides and bottom of the bowl, where residues of egg yolk lie. You cannot see them, but they are there and they should be incorporated into the rest of the mixture, while it is still hot. Stir well.
Add the heavy cream and stir to combine.
Put the mascarpone cheese into a large bowl and stir to soften.
Add the custard (from step 1) into the mascarpone, a little at a time, stirring well after each addition. Whisk well to ensure that no lumps are left.
Blend the ice cream mixture for one minute.
Thoroughly chill the ice cream mixture by choosing one of the methods below:
Pass the mascarpone ice cream mixture through a fine mesh sieve and into a sealable container. Refrigerate for 12 hours and up to 3 days.
Strain the mascarpone ice cream mixture through a fine sieve and put it in a sealable bag. Place the bag in a large container and fully cover it with lots of ice. Leave for 3-4 hours to thoroughly chill.
Before churning, check if the ice cream mixture is thoroughly cold:
• an instant-read thermometer in the ice cream mixture should read around 4ºC – 8ºC (39ºF-46ºF). when submerged in the ice cream mix.
• if no thermometer is available, check with your index finger; the ice cream mixture should feel fridge-cold to the touch.
If needed, add more ice and leave until thoroughly chilled.
If using this method to chill the ice cream mixture, apply it for the soaking syrup and the strawberry-daquiry (step 3) also, to have them cold and ready when needed.
Cut the strawberries in 0.5 cm (0.2 in) small pieces and place them in a large bowl. Sprinkle the sugar over them and give them a stir, leaving the spatula in the bowl.
Leave them for 2 hours at room temperature, stirring 3-4 times to help the sugar melt.
For the soaking syrup:
Measure out 100 gr/ml (3.5 oz.; 1/2 cup) of the strawberry juice which has formed on the bottom of the bowl and place in a medium saucepan. Bring to a boil over medium to high heat and let it boil for 2 minutes. Keep an eye on it and if it starts turning a very dark red colour, remove it from the heat before the time is over.
Remove from the heat and pour it into a bowl. Allow to cool and add the 10 gr white rum (1 Tbs.), stirring well. Cover well and chill in the refrigerator overnight.
For the strawberry – daiquiri swirls:
Put the strawberries and any leftover syrup into the same saucepan and warm over medium-high heat.
Cook, stirring often, until most of the water has evaporated and the strawberry sauce reaches a jam-like consistency. This should take around 10 minutes.
Pay extra attention towards the end and stir constantly, scraping the saucepan to prevent the sauce from sticking to the bottom. If there are larger chunks of strawberries, crush them with the back of a fork.
Remove from the heat and transfer to a bowl to cool. For a smoother finish you can also blitz it with an immersion blender, if desired.
When cooled, add the remaining 20 gr white rum (2 Tbs.), cover well and chill in the refrigerator overnight.
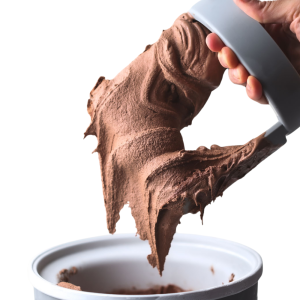
This ice cream mixture expands and becomes airy as it churns. You’ll know it’s ready when it looks smooth, creamy, and slightly wavy—similar to soft-serve ice cream. Churning time varies depending on your machine and can take anywhere from 30 to 70 minutes.
To check the texture, lift a spoonful. It should be thick enough to stay on the spoon, but still soft. If it looks too thin or starts melting immediately, it needs more time.
If you’re unsure, let it churn for 10 more minutes. Keep in mind that it won’t look like store-bought ice cream at this point—it will still be soft. It only becomes firm and scoopable after a few hours in the freezer.
Stop the machine once the mixture is thick and creamy. If you continue churning beyond that point, the mixture can start losing the air it has built up and may seize, resulting in a dense, heavy texture.
One important note: some ice cream makers are programmed to stop automatically after a fixed time, but that doesn’t always mean the ice cream is ready. If your machine stops and the mixture still looks too soft, simply restart it and continue churning until the texture improves.
Check that the ice cream mixture is thoroughly chilled before churning: it should feel fridge-cold to the touch.
Prepare the ice cream maker according to the manufacturer’s instructions.
With the machine running, pour the chilled ice cream mixture through the canister and into the ice cream machine.
Churn until the mascarpone ice cream is creamy and has fluffed up. Depending on your ice cream maker, this may take up to 40-50 minutes.
Add the white rum (for the mascarpone ice cream) a little at a time. Leave the ice cream to churn for 10 more minutes.
Remove the removable freezer bowl filled with the ice cream from the ice cream machine, cover with a lid and put it in the freezer for one hour.
Prepare the ladyfingers by roughly breaking them with your hands and putting them in a food processor. Pulse until fine.
Add the soaking syrup (from step 3) and pulse again to uniformly moisten the ladyfinger crumbs. If needed, use a spoon to reach the crumbs in the corners of the food processor.
Remove the strawberry daiquiri sauce from the refrigerator and give it a stir.
Cover the bottom of the container (see recipe notes below) with mascarpone ice cream. Add the strawberry-daiquiri sauce to create a thin layer, and add a few spoonfuls of the soaked ladyfinger crumbs. Cover with ice cream and continue alternating the layers, taking care to finish with ice cream on top.
To create the swirls: starting with the corners, insert a knife in a vertical motion all the way to the bottom and then pull upwards in a circular motion as if you wanted to fold the ice cream inwards. Do this 4-5 times in the centre, as well.
Cover and let set in the freezer for 5-6 hours.
Put in the freezer to set: before serving the ice cream or moving it to a container for storing, you have to put it in the freezer to set. To do so, turn off the ice cream maker and:
· remove the removable freezer bowl (still filled with the ice cream) from the ice cream machine
· remove the paddle, scraping any ice cream attached to it back into the ice cream bowl
· place it in the freezer, uncovered
Setting time depends on many factors; see notes below for indicative times.
Serve or store: when it sets, you can serve it directly from the removable freezer bowl or transfer it to an airtight container for longer storage.
The setting time depends on the type of ice cream maker you’re using. Here are the general guidelines:
3–5 hours for machines with removable freezer bowls (these bowls must be pre-frozen before churning)
Under 1 hour for machines with built-in compressors and aluminum bowls
⚠️ Important: Ice cream in aluminum bowls sets quickly. Do not leave it for too long—once fully frozen, it can become extremely hard and difficult to remove without risking scratches to the bowl. Always monitor it closely.
To check if the ice cream is ready, aim for an internal temperature of –11°C (12°F). If you don’t have a thermometer, use this simple test:
Insert a round-tip knife all the way to the bottom of the ice cream:
✔ If it goes in smoothly but meets gentle resistance, it’s ready
✖ If it feels hard on top but soft underneath, it needs more time
✖ If it’s too firm to insert the knife, it’s over-frozen and likely too hard to scoop
If it’s over-frozen, don’t worry—head to the next section for how to bring it back to scoopable.
If the ice cream sits in the freezer in the removable freezer bowl for too long after it has set, it can become too hard to scoop or remove.
To make it scoopable again:
Place the bowl in the refrigerator and allow the ice cream to soften gradually.
Here’s how long that may take:
4–10 hours for removable freezer bowls (pre-freeze models)
1–2 hours for aluminum bowls (from compressor ice cream makers)
Note: These times are approximate and may vary depending on your fridge and the amount of ice cream. Check the texture occasionally as it softens.
Once the ice cream is soft enough to scoop—or its internal temperature reads approximately –11°C (12°F)—you can:
✔ Transfer it to another container and store it in the freezer
✔ Or serve it directly from the bowl
Just be sure to avoid digging into an over-frozen bowl with hard utensils, especially if using a nonstick-coated or aluminum bowl.
Straight after churning, the ice cream has a soft-serve consistency and melts almost instantly on contact. At this stage, it’s too soft to serve neatly or transfer easily—it’s simply too messy to handle.
Freezing the ice cream immediately after churning allows it to set properly. This step brings it to the right texture: scoopable, stable, and easy to portion or transfer into a storage container.
It’s the final step that turns churned ice cream into finished ice cream.
Storing: Transfer the finished ice cream to a lidded container and store it in the freezer for up to one month.
Cover it well to protect it from absorbing any unwanted freezer smells.
Scooping: Like all artisanal-style ice creams, this one freezes hard over time.
To make it scoopable again, place the container in the refrigerator for 45–60 minutes, or until the internal temperature reaches about –11°C (12°F).
Once softened, it’ll scoop cleanly and serve beautifully.
Your privacy settings
Manage Consent Preferences
Necessary
Analytics
Embedded Videos
Marketing
Facebook Advanced Matching
Facebook CAPI